wednesday, september 21st, 2016
wow... it's been 4 years since my last post! wow... well... be prepared because i'm moving and get to completely decorate a new HUGE house from scratch & you're coming along... i'll be back soon!!! i promise!
xoxo
lindsay
Wednesday, September 21, 2016
Sunday, December 16, 2012
five. a mess of a desk!
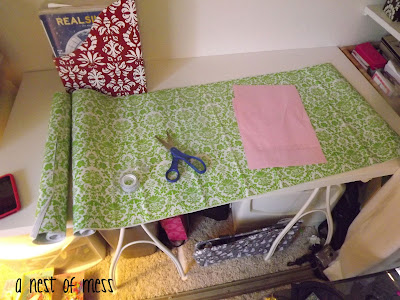
i share my craft desk with my kids' playroom. i have the closet, they have the room. i actually really like having my desk in the closet... i like that i can close the curtains if i don't feel like picking up. but this is becoming a really, really bad habit for me. it becomes that "place" i throw things in when i don't have time to put the item where it really belongs. my idea was to create a space that would become part of the room's decor so that i would be forced to keep the space clean, so that i could show it off!!

wow! this is my before... holy moly... see what i mean about using the space as a quick dumping ground? boring, ugly.... hard place to be creative.
my bins on the left of the desk are actually really useful & functional, you just can't see them because of all the junk!

i picked up this adorable shelf liner paper at TJ Maxx, like two years ago. it was in the clearance section & even though i didn't know yet where i would use it, i HAD to get it! it was $3! the colors in the playroom are navy blue & green. super preppy & cute! also they work well for my girl & boys. i wanted something above my desk to give it some "je ne sais quoi". this is the place i sit the most, so why not have something pretty & fun to look at & inspire!
so cute right?!? and it already had sticky on the back! brilliant! i just used a baby wipe to clean the walls, let it dry & then started measuring where the paper would go. because this pattern is so busy it was so easy to hang, not having to worry about lining up seams etc. i have bookshelves on the right side of my desk so that was the trickiest part, trying to account for the shelf brackets. i found making a pattern helped me to measure the paper well.

i could not believe how easy this was! just peel & stick...

i decided not to go the entire length of the wall, instead just above my desk, kinda like a bulletin board. i wasn't too concerned about the end... i have loads of ribbon i wanted to use to frame it.
i used tacky glue on the paper & the piece of ribbon & let it sit for a minute to make sure it would stay.

i chose a natural colored ribbon because of the wall color in the closet. i used a pushpin to hold the ribbon in place while it was drying.


i am so happy how it's turning out!
now that my yummy green wall was complete, i turned my focus back onto the load of items that were living on the desktop. i love to purge & use things i already have, so i was so excited to get this desk in check!
i found these little metal buckets that my kids probably received as a party favor & could not have been more pleased with the colors! i sorted through all the writing instruments on my desk and sorted them into pen/pencils & markers/highlighters.

i also picked these adorable little containers in the dollar section of target, but never found a use for them... ta da! i used one to house my pushpins, one for my bucket o'pens and one for my most used desk items, ie. stapler, tape etc.

my goal is to have my desk to actually use, i know, crazy right? so even though all my little bins are super cute, i did not want them all over my desk.
i love pushpins, really, like love them. they always come in so handy & this was the perfect place to use them. the green & blue metal buckets came equipped with little handles, so i just stuck in a few pushpins, and up they went. for the 2 rectangle bins, i used binder clips to the sides of the bin, opened up the other side and up they went! i decided to keep the soft grey one on the desktop as it holds my pens/pencils & stacks of post-its.


so just my lamp & my small bin of pens/pencils & post-its! oh & my desktop would not be complete without my grammie's button box. on every desk i have owned, it has lived :) she was the craftiest person i have ever known & the little button box always makes me smile.


my bins on the left of the desk are actually really useful & functional, you just can't see them because of all the junk!


i used tacky glue on the paper & the piece of ribbon & let it sit for a minute to make sure it would stay.

i chose a natural colored ribbon because of the wall color in the closet. i used a pushpin to hold the ribbon in place while it was drying.


i am so happy how it's turning out!
now that my yummy green wall was complete, i turned my focus back onto the load of items that were living on the desktop. i love to purge & use things i already have, so i was so excited to get this desk in check!
i found these little metal buckets that my kids probably received as a party favor & could not have been more pleased with the colors! i sorted through all the writing instruments on my desk and sorted them into pen/pencils & markers/highlighters.

i also picked these adorable little containers in the dollar section of target, but never found a use for them... ta da! i used one to house my pushpins, one for my bucket o'pens and one for my most used desk items, ie. stapler, tape etc.

my goal is to have my desk to actually use, i know, crazy right? so even though all my little bins are super cute, i did not want them all over my desk.
i love pushpins, really, like love them. they always come in so handy & this was the perfect place to use them. the green & blue metal buckets came equipped with little handles, so i just stuck in a few pushpins, and up they went. for the 2 rectangle bins, i used binder clips to the sides of the bin, opened up the other side and up they went! i decided to keep the soft grey one on the desktop as it holds my pens/pencils & stacks of post-its.


so just my lamp & my small bin of pens/pencils & post-its! oh & my desktop would not be complete without my grammie's button box. on every desk i have owned, it has lived :) she was the craftiest person i have ever known & the little button box always makes me smile.


Saturday, October 20, 2012
three {part 2}
while the paint was drying on the bookcase & shelves i moved onto designing the boxes where the shoes would live. these particular boxes i see all over, target, osh, lowes, k-mart etc. they are awesome, inexpensive and come in so many colors. i have used them all over my house {look for future posts} & with the genius brain of my mother, have figured out a way for a label to adhere. i chose the black boxes for this room because i thought they looked a little more formal & i loved them with the dark gray of the bookcase.

my 2 little guys do not read yet so i thought the best way for them to identify which bin was theirs was to add a picture of them. i printed out 3 black & white photos and using double sided tape, taped them to brightly colored scrapbook paper. i then fed them through my xyron label maker to laminate them.
*side note: the xyron was a birthday present to myself last year & i have used it so many times, it's paid for itself. it is amazing! it laminates & makes just about anything into a sticker or a magnet. i cannot say enough about it! the day i brought it home i took a picture and pined it onto pinterest. the next week i got an email from xyron thanking me for pining it & they sent me 3 free boxes of laminate, sticker & magnet supplies! so cool.

so i cannot take credit for the method of adhering the labels... that was all my momma. because i always laminate my labels, they tend to be too slick to stick to most surfaces. i tried hot glue, tacky, elmers & gorilla glue. they would just peel off. my mom's idea was to use a hole punch on the corners of the labels, then on the actual box, make a small hole & put a brad through! brilliant! they work perfectly & look so finished.
now i could have been done but i was so inspired by the inspiration photo, that i wanted to add some more color to the bookcase. using paper from the same pad that the pictures are backed on, i chose 4 different but similar patterns, also very brightly colored. i covered the back of the bookcase & each of the 2 shelves. i just used regular elmers glue.

it fit perfectly behind our front door & i don't mind our boots neatly stacked next to it. doesn't the paper look so cute? i could not have been more pleased!

we decided that the hubbs shoes are way too big for a bin & he doesn't really mind anyway, so the 4th bin is for me {i just haven't added my pic yet lol} we are now going into week 2 with our new system... i cannot believe what a difference it has made! no tearing through a huge bin only to not find a match plus the kids LOVE it & love using it. i must admit i have a few more pairs of shoes {ummm, like 50, ouch} that live upstairs in neat shoe boxes in my closet, but this bin is for the shoes i wear everyday ie. flip-flops, converse, toms etc.

how do you keep your kids' shoes?
Friday, October 19, 2012
three {part 1}
as i have mentioned before, i have 3 kiddos... therefore, 976,087,672 pairs of shoes. i have gone back and forth trying to figure out the best way to contain these and not tear my hair out looking for matching pairs, certain requested shoes etc. i have scoured the internet and pinterest looking for creative ways for them to be stored.
not too many homes in california are blessed with mud rooms, so i have to use my front entry hall as a substitute.
my first attempt was this large, wicker trunk my mom gave us. it used to 'house' blocks, but they never played with them, so i thought it was the perfect fit for shoes. plus i didn't mind the way it looked in our entry & it closed. perfect! well not so much. this ended up being the bain of our existence. the 'shoe basket'... what this would end up becoming, was a huge mess of shoes on the floor whenever someone went hunting for a particular pair. the basket was too big. it was just impossible to actually find a pair.
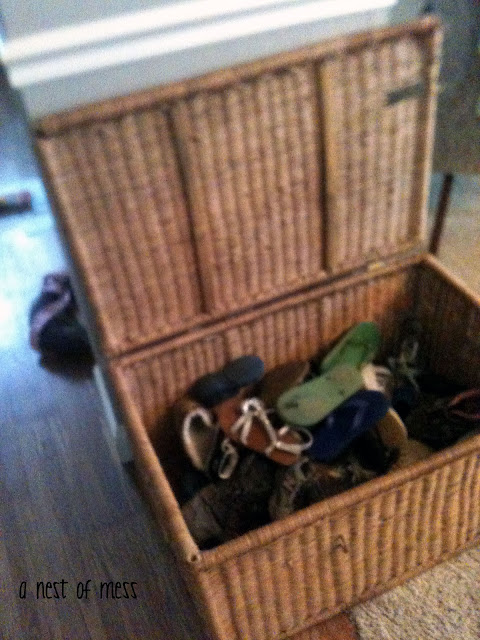
my second attempt was using the 'shoe basket' again, but this time keeping 3 small baskets inside, each child had their own bin. this idea lasted about 2 days...
*side note: in addition to the horrid 'shoe basket' i also had a tin boot tray right by the front door which was just supposed to house our rain boots. so in all, i had 2 different systems going at the same time, in the same room, about 5 feet from each other. yea, not so pretty. the boot tray itself is awesome. but random shoes were now being dumped into either container, thus spreading the frustration.
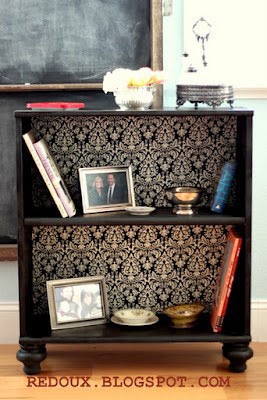
thank god for the amazing pinning power of the family/friends i follow on pinterest, because this came across my computer.

the before picture i took somehow never made it from phone to computer... so you can see the original 80's yellowish colored wood in the back. my entryway & living room are gray, so i thought to keep in the same pallet would fit best. i went for spray paint. the color i used was rust-oleum, ultra cover in dark gray gloss. a good cleaning, a light sanding and i was good to go. i bought 2 cans & still have most of can 2.

it came with 2 shelves, but i only needed one, so i just painted and put one of the shelves on the bottom, just in case i want to reuse the bookcase later on for something else.
*check back tomorrow for the rest of the project
not too many homes in california are blessed with mud rooms, so i have to use my front entry hall as a substitute.
my first attempt was this large, wicker trunk my mom gave us. it used to 'house' blocks, but they never played with them, so i thought it was the perfect fit for shoes. plus i didn't mind the way it looked in our entry & it closed. perfect! well not so much. this ended up being the bain of our existence. the 'shoe basket'... what this would end up becoming, was a huge mess of shoes on the floor whenever someone went hunting for a particular pair. the basket was too big. it was just impossible to actually find a pair.

my second attempt was using the 'shoe basket' again, but this time keeping 3 small baskets inside, each child had their own bin. this idea lasted about 2 days...
*side note: in addition to the horrid 'shoe basket' i also had a tin boot tray right by the front door which was just supposed to house our rain boots. so in all, i had 2 different systems going at the same time, in the same room, about 5 feet from each other. yea, not so pretty. the boot tray itself is awesome. but random shoes were now being dumped into either container, thus spreading the frustration.
thank god for the amazing pinning power of the family/friends i follow on pinterest, because this came across my computer.

gorgeous right?! i'm pretty sure this particular shelf has been pinned and re-pinned about a bajillion times. plus when i went to redoux.blogspot.com i was instantly hooked. she is amazing!
so my thought was that i could use the smaller bin idea but put them into a bookshelf! plus i love anything i get to add pretty paper or fabric to spice it up.
i couldn't believe how lucky i got when i went searching for the bookcase. the third thrift shop i went into, i found it, $18! & it just so happened that all furniture was 50% that day! what luck, $9 for a basic small bookcase.

the before picture i took somehow never made it from phone to computer... so you can see the original 80's yellowish colored wood in the back. my entryway & living room are gray, so i thought to keep in the same pallet would fit best. i went for spray paint. the color i used was rust-oleum, ultra cover in dark gray gloss. a good cleaning, a light sanding and i was good to go. i bought 2 cans & still have most of can 2.

it came with 2 shelves, but i only needed one, so i just painted and put one of the shelves on the bottom, just in case i want to reuse the bookcase later on for something else.
*check back tomorrow for the rest of the project
Wednesday, October 17, 2012
two
so i didn't really realize how cheesy that first post sounded... wow... i guess i was just at a lack for words, oh well.
so, why the title 'a nest of mess'? well, i guess it's kinda catchy, plus i really do love birds. like an obsession. not owning them or bird watching, but like on pillows, or wallpaper. one of my best friends sent me this video, couldn't help but share it. she loves to give me s*^t about my birds. & the mess part? well, my home is a disaster; most of the time. i do have three small birds {kids}.
enjoy. it is hilarious.
so, why the title 'a nest of mess'? well, i guess it's kinda catchy, plus i really do love birds. like an obsession. not owning them or bird watching, but like on pillows, or wallpaper. one of my best friends sent me this video, couldn't help but share it. she loves to give me s*^t about my birds. & the mess part? well, my home is a disaster; most of the time. i do have three small birds {kids}.
Tuesday, October 16, 2012
one
this is my new year's resolution... yes, it is october 16th... but for me, being able to actually cross-off a resolution is pretty impressive. my list contained a few things, most of which people list every year, 'go to the gym, loose weight, budget better, read more...' but my number one was this; this blog.
i have been an avid blog reader for many years. actually started one about 6 years ago. needless to say, it had one post.
fast-forward to 2012... i am a busy mom, wife, girl-scout leader, project engineer & on too many boards to write about. pretty much everything for everyone else. this blog is for me!
so who am i? well, i'm lindsay. i have a masters degree i have never used, i currently work in the construction field. when i am not at work, i am home with my three crazy, beautiful kids, grace 6, brody 3 & declan 4. i hate to cook. i hate to clean. but having these three birds, makes the above mentioned nearly impossible.
as i said above, i have been reading & ogling over many, many blogs, which i hope to post my favs here. i thought to myself... 'why can't i do this?' well, i am.
so, welcome to 'a nest of mess'. what i hope for this blog is to share my favorite things, ideas, inspirations & dreams. i love home design & organization & i hope this blog will inspire me to make my nest a place of organized beauty. oh & maybe learn a little about cooking & cleaning along the way.
Subscribe to:
Posts (Atom)